Your shed is the perfect place to store a whole host of items, especially gardening tools, garden furniture and other bits and pieces you might not want or be able to fit in your home at this time. So, when the shed roof felt starts to come apart, you must repair that shed felt roof as soon as possible to keep its contents safe and dry.
A garden shed roof repair, especially felt repairs, might seem costly. You’ll be happy to know this isn’t always the case. In fact, you can do your very own patch repairs, which we talk about later in this guide, featuring steps to help lead you through the process.
In this article, discover more about shed felt roof repair and information about the ever-popular felt material homeowners have loved for decades.
Table of contents
- How long does roof felt last?
- How much does a felt shed roof repair cost?
- Repairing a shed felt roof
- Are there alternatives to shed roof felt?
How long does roof felt last?
The lifespan of a felt shed roof is typically between 10 and 30 years. What an impressive amount of time! Considering the material is exposed to the elements daily. To ensure the material has this long life, you must maintain it when you notice any indication of damage.
Here are common signs of roof felt damage:
- Tears and cracks
- Bubbles and blistering
- Ponding
- Organic growth (moss and algae)
Some of the above will require a full replacement. Find out more about these issues, the different types of roofing felt and using roofing felt on a flat roof in our ‘Roofing felt buyer’s guide’.
How much does a felt shed roof repair cost?
The average cost of felt roof repair can range between £40 to £500. The actual price of your roof repair will result from several factors, including the amount of work needed and whether you use a professional to complete the repair.

Now, onto how you repair a felt shed roof!
Repairing a shed felt roof
It’s essential you check your felt roof shed for damages. Leaving areas with impairments for too long can mean problems not only for the shed but also for the items stored inside, which would mean the added risk of high repair felt roof costs or a complete roof replacement.
If you have managed to spot damages early, here’s what you can do.
Patch repair felt on a shed roof
You don’t always have to do major repairs on a felt shed roof. The size of the repair will depend on the extent of the damage and whether you want a uniform appearance to your shed.
However, any noticeable issues to the shed roof felt will need repair to prevent water ingress. An example of this is if the wind has found its way under the roof felt and caused a hole. This is where patching roof felt comes in handy.
For a patch repair, you simply need a small section of felt (enough to cover the required area) and some felt adhesive. It’s quick, simple and cost-effective.
Let’s look at what you’ll need:
- Shed roof felt
- Hammer or screwdriver (whichever you use will depend on whether the fascia boards and finials have been screwed or nailed on)
- Flat-headed screwdriver
- Stanley knife
- Tape measure
- Shed felt adhesive
- (If needed) New finials and fascia boards
Have all the things you need? Let’s get to the repairs!
Step one: Remove finials and fascia boards
Remove the finials and fascia boards using a hammer or screwdriver and put them in a safe place. If you need to replace these, now would be a great time to do so.
Step two: Remove the tacks
Use a flat-headed screwdriver to remove the tacks and pull off the damaged felt. Be careful as you do this, as you don’t want to cause further breakage by accidentally tearing the undamaged felt.
Step three: Measure the shed roof and cut new felt to size
Measure the length of the shed roof and cut the new felt to the required size, leaving at least a two-inch overlap on all sides. You can test its placement without nailing it down by putting it on the shed roof and adjusting it as needed.
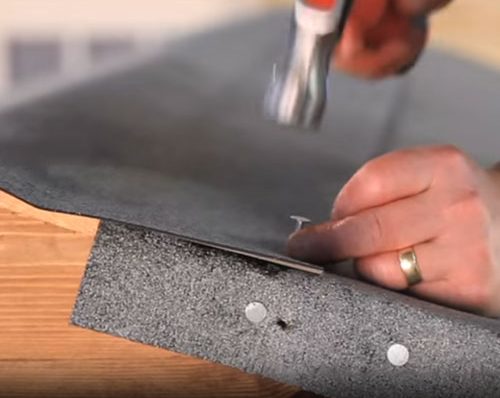
Step four: Nail down the new felt
With your newly cut felt, apply felt adhesive to the patch, lay it as flat on the shed roof as possible (smoothing to avoid wrinkles) and nail it down with the nails at six-inch spaces apart.
Step five: Re-attach finial and fascia boards
If you don’t need new finial and fascia boards, you can re-attach the existing ones as needed. If you did get new timber boards, make sure to treat these before attaching them to increase their longevity. If there are any pieces of felt roofing hanging below the fascia boards, trim these for a smart appearance.
With the new felt, make checks over time and maintain as necessary to reduce the risk of needing a high-cost repair later on.
Full felt roof shed repair
If the shed felt is beyond patch repair, you’re going to need to fully repair the roof. You can find the full explanation of the steps for how to felt a shed roof via our step-by-step ‘Felting a roof’ guide. This handy article also covers flat roofing if you need help when it comes to adding felt to a flat roof.

Are there alternatives to shed roof felt?
Absolutely! Some of the most favourable materials include:
In fact, we have a whole guide dedicated to explaining these alternatives so you can make the right decision for your needs. Check out ‘What should I use to re-roof my shed roof?’ to find out more.

A shed roof repair isn’t the only way to keep your shed in good shape. Curious about what else you can do with your shed to protect it? Perhaps you want to upgrade to a new garden shed? Check out our other Help and Advice guides to learn how to waterproof shed walls, how to install guttering on your shed and choose the perfect shed for you via our Shed buyer’s guide.


